Hello Friends!
Hope you are doing well :)
If you want to add a new custom field to customer address during checkout process then just follow my step:
- Adding New Field in Database Tables
First of all you have need to create the all require fields in your database through the phpMyadmin,so lets start the process.
Here we are taking "govt_id" as new fileds name
eav_attribute table
insert a row in this table with values entity_type_id = 2, attribute_code = govt_id, backend_type = varchar, fontend_input = text, fontend_label = Govt ID No#, is_user_defined = 1, is_required = 1, default = NULL.
eav_entity_attribute table
insert a row in this table with values entity_type_id = 2,attribute_set_id =2, attribute_group_id = 2, attribute_id = (The attribute_id or the primary key of the row inserted in the eav_attribute table)
customer_eav_attribute table
insert a row in this table with values attribute_id = (The attribute_id or the primary key of the row inserted in the eav_attribute table), is_visible = 1 rest all column will take default values
customer_form_attribute table
1. insert row in this table with values form_code = adminhtml_customer_address and attribute_id = (The attribute_id or the primary key of the row inserted in the eav_attribute table). This required for the attribute to show up in the admin
2. insert row in this table with values form_code = customer_address_edit and attribute_id = (The attribute_id or the primary key of the row inserted in the eav_attribute table). This required for the attribute to get saved in edit address form and checkout page
3. insert row in this table with values form_code = customer_register_address and attribute_id = (The attribute_id or the primary key of the row inserted in the eav_attribute table). This is required to save the attribute in the create account page
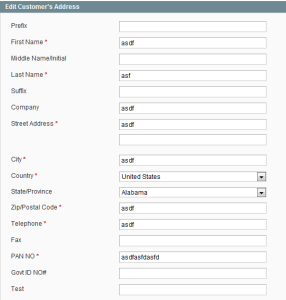
After doing this step, you should be able to do see your new address attribute in the admin. -
 In Last Step we need to add govt_id column in the tables sales_flat_order_address, sales_flat_quote_address
- Now we have need to add the new field in both shipping.phtml and billing.phtml files, you can find both files in your theme folder app/design/frontend/yourtheme/default/template/checkout/onepage
billing.phtml :
<li class="fields">
                    <div class="field">
                        <label for="govt_id" class="required"><em>*</em><?php echo $this->__('Govt ID#') ?></label>
                        <div class="input-box">
                            <input type="text" name="billing[govt_id]" value="<?php echo $this->htmlEscape($this->getAddress()->getGovtId()) ?>" title="<?php echo $this->__('Govt ID#') ?>" id="billing:govt_id" class="input-text required-entry" />
                        </div>
                    </div>
                </li>
shipping.phtml :
<li class="fields">
                        <div class="field">
                            <label for="govt_id" class="required"><em>*</em><?php echo $this->__('Govt ID#') ?></label>
                            <div class="input-box">
                                <input type="text" name="shipping[govt_id]" value="<?php echo $this->htmlEscape($this->getAddress()->getGovtId()) ?>" title="<?php echo $this->__('Govt ID#') ?>" id="shipping:govt_id" class="input-text required-entry" />
                            </div>
                        </div>
                    </li>
- In Next Step you have need to add new fields in config.xml file
Add this one under <sales_convert_quote_address></sales_convert_quote_address> tag
                <govt_id>
                    <to_order_address>*</to_order_address>
                    <to_customer_address>*</to_customer_address>
                </govt_id>
Add this one under <customer_address></customer_address> tag
                <govt_id>
                    <to_quote_address>*</to_quote_address>
                </govt_id>
- Finally you have need to add the new field in templates in same format as given other fields
To change the format, go to System -> Configuration -> Customer Configuration -> Address Template
There you will see 5 options, we need to change all.
Text
Add {{depend govt_id}}ID# {{var govt_id}}{{/depend}} where ever you want it. {{depend}} basically checks, if govt_id is not empty.
Text One line
Add {{depend govt_id}}ID# {{var govt_id}}{{/depend}} where ever you want it. This format shows up in the checkout page shipping,billing address dropdowns.
HTML
Add {{depend govt_id}}<br/>ID# {{var govt_id}}{{/depend}}. This format is used in many places like Order View, Address Display etc.
PDF
Add {{depend govt_id}}<br/>ID# {{var govt_id}}{{/depend}}|. This format is used in PDF invoices, shipments etc.
Javascript Template
Add <br/>ID#{govt_id}. This is used in admin add/edit address area.
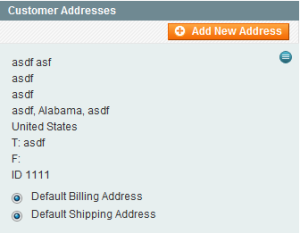
After saving these in the configuration, the new address format should be visible. You can view this here

That's All! :)
Enjoy Code! | Raghunath Blog
 In Last Step we need to add govt_id column in the tables sales_flat_order_address, sales_flat_quote_address


Very good :)
hi,
I follow the steps,Govt ID# show in one page but value do not store in database. How can solve this problem.please help me.
please give me full path in “config.xml” files
Hi Smritte,
you have need to search the “config.xml” file in “customer” core files
core/Mage/customer/etc/…
What changes needed to add dropdown field
Hi Sheetal,
Your most welcome @ my blog!.
Are you want to add the drop-down fields?
Will the params also available for Webservices like SOAP/XML-RPC?
where do you set the getGovtId() function? Thank you!
Hi Andrej,
getGovtId() this is not a function, we can get the value of any field from database using same format. Here field name is “govt_id” and that’s why we are getting the value that address field by getGovtId().
I hope you can understand now! :)
Hello. Ok, then I’ll try to get other fields, this way. Thank you!
Your welcome! :)
you can contact me also by send a mail on my email raghunath.0087@gmail.com
Nice Article ! My custom field not being saved in database , how can i solve this problem ?
Hi Raghunath,
I tried to add your code but the custom input is not saved in the database. Can you help me or give me advice?
Thanks,
Adrian Pavel
Hi Adrian,
Did create the new fields in your database?
Hi Raghunath.
I have a problem in checkout step in Frontend Add Attribute value not save in Admin But Admin Save Value show in Form Edit
So please Provide Some Suggestion Please